LESSON 5: Method of Joints
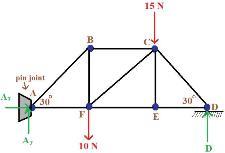
The proper way to break this truss down using the method of joints would look like this:
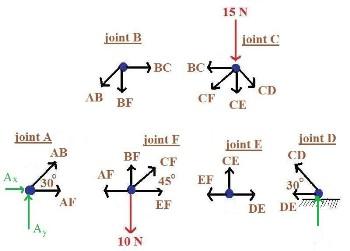
Notice how each member, or bar, within the truss has been broken and essentially turned into a vector that is pulling its respective joints. It is standard to have the vectors that represent each member of the truss to point outwards from the joint. This is because we assume that each member of the truss is in tension, meaning that each member is being stretched. Most metals naturally resist stretching, so if a bar is being stretched, it wants to return to its original unstretched state, so the bar is pulling the joints toward each other in order to return to its unstretched state. Pretend you are holding a rubber band and stretching it between your two hands. The rubber band is in tension, and it wants to pull your two hands toward each other. For trusses, the members are the rubber band, and the joints are your hands.
A link to an example problem is included here: click to view problem Hopefully this example problem will help clarify the process.

Tutorial Options:
Return to Home Page
Statics Lessons Home Page
Statics Example Problems
Continue to Next Section
Return to Home Page
Statics Lessons Home Page
Statics Example Problems
Continue to Next Section
Lesson 1:
Vectors
Magnitude
Unit Vectors
Cos Angles
Lesson 2:
Sum of Forces
Sum of Forces 2
Lesson 3:
3D Sum of Forces
Lesson 4:
Moments
Moments 2
Lesson 5:
Trusses
Method of Joints
Method of Sections
Lesson 6:
Distributed Load
Vectors
Magnitude
Unit Vectors
Cos Angles
Lesson 2:
Sum of Forces
Sum of Forces 2
Lesson 3:
3D Sum of Forces
Lesson 4:
Moments
Moments 2
Lesson 5:
Trusses
Method of Joints
Method of Sections
Lesson 6:
Distributed Load